Protection & Control Relaying Schematics
This technical article explains the AC/DC schematic representation of the protection and control systems used on power networks. This includes AC schematics and DC schematics and diagrams that prominently feature relaying.
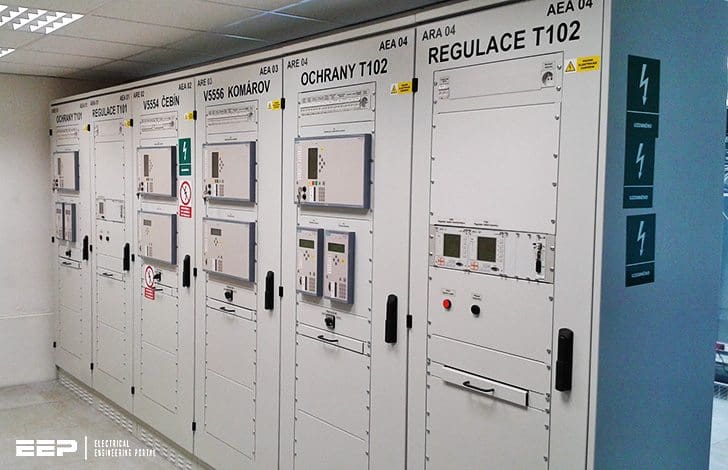
There are other equally important types of drawings that are not the subject of this article including logic diagrams, data tables and single line diagrams, wiring diagrams, data communication schematics as well as those single line diagrams that do not significantly address relaying.
Contents:
1. AC Schematics
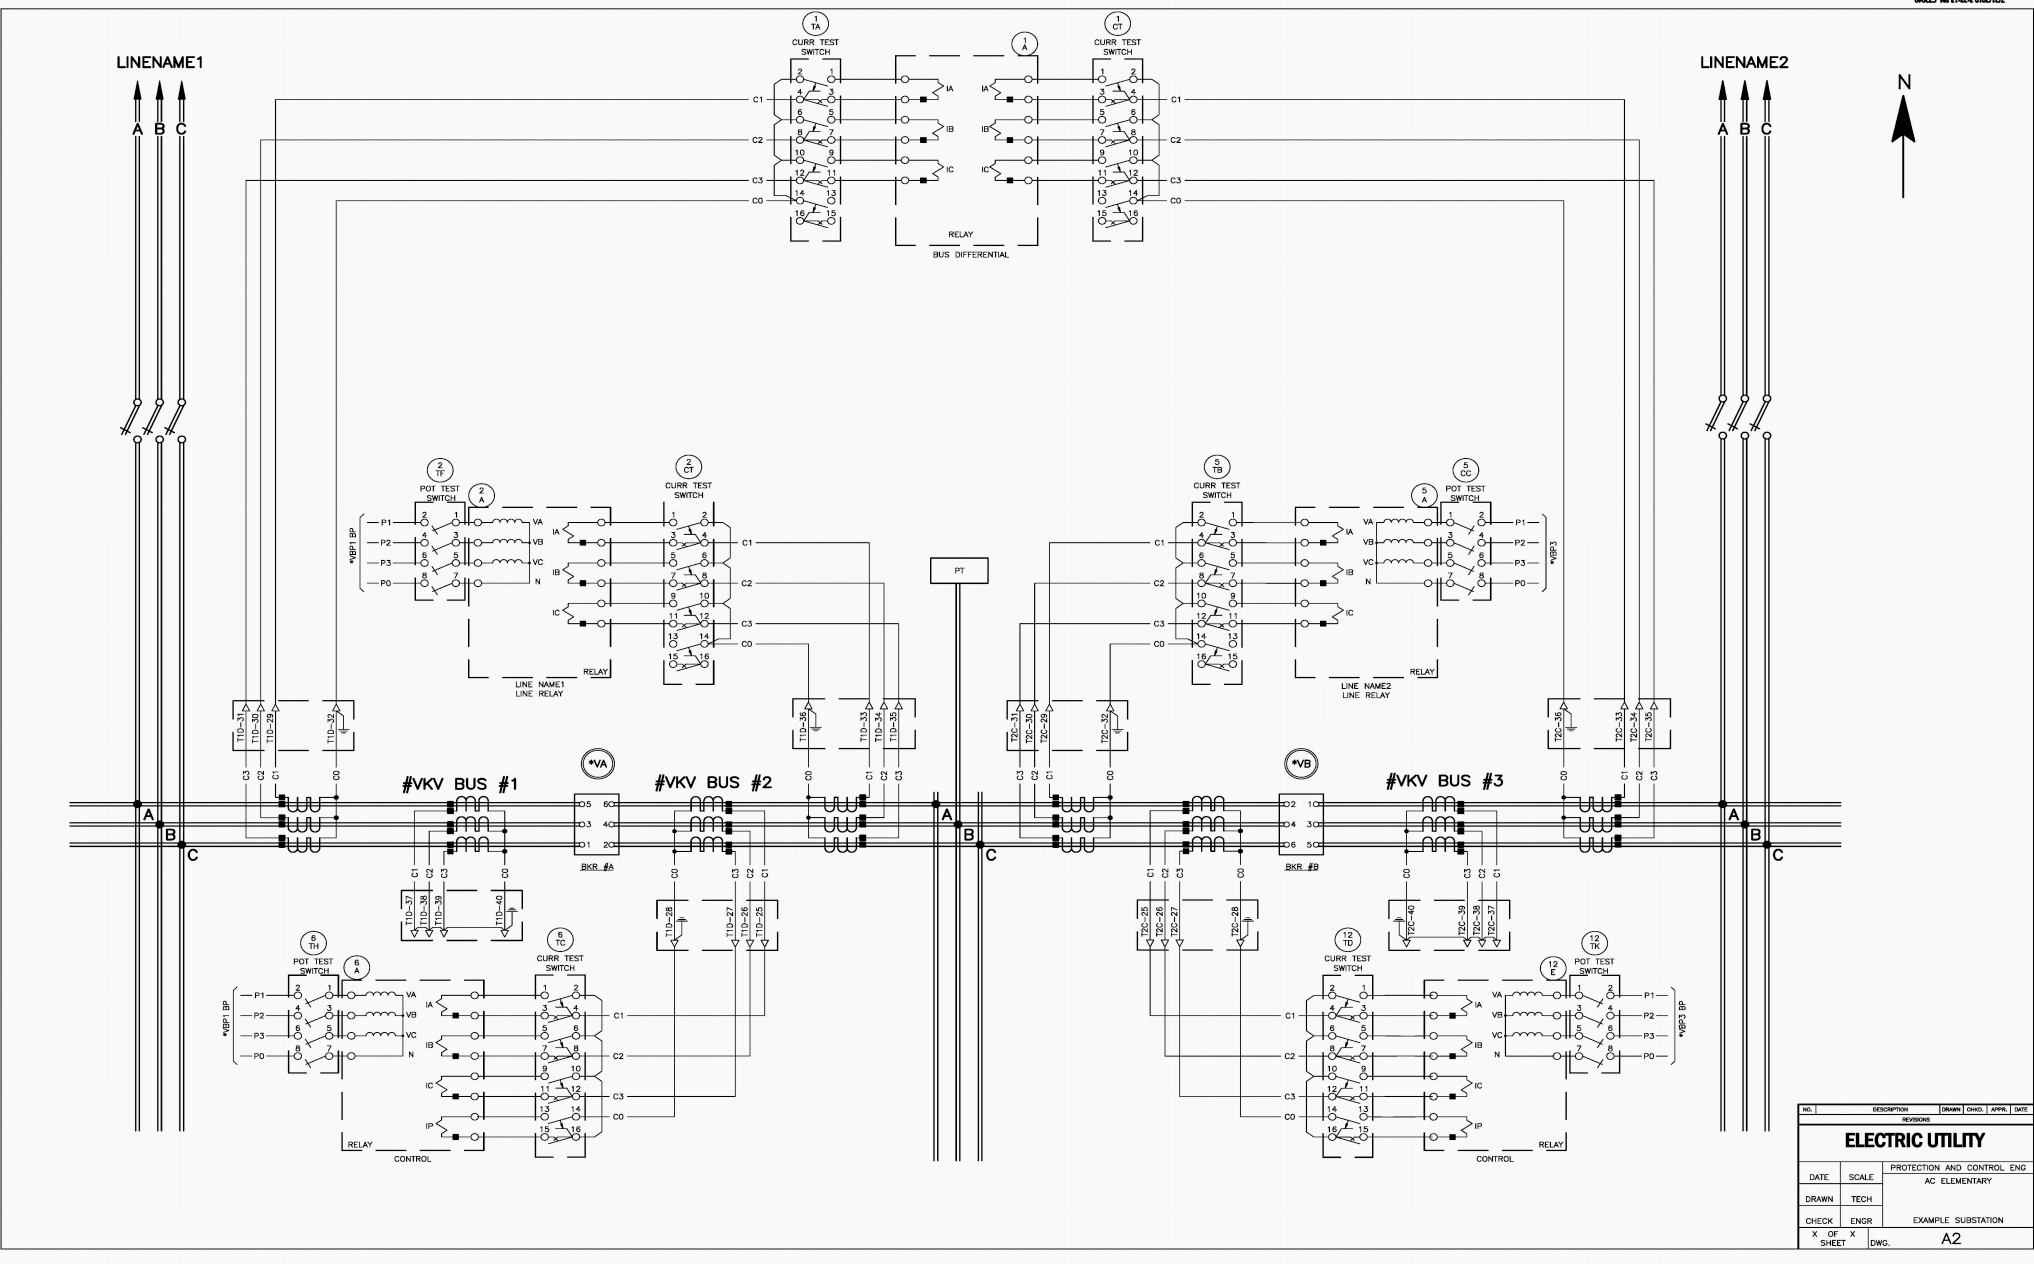
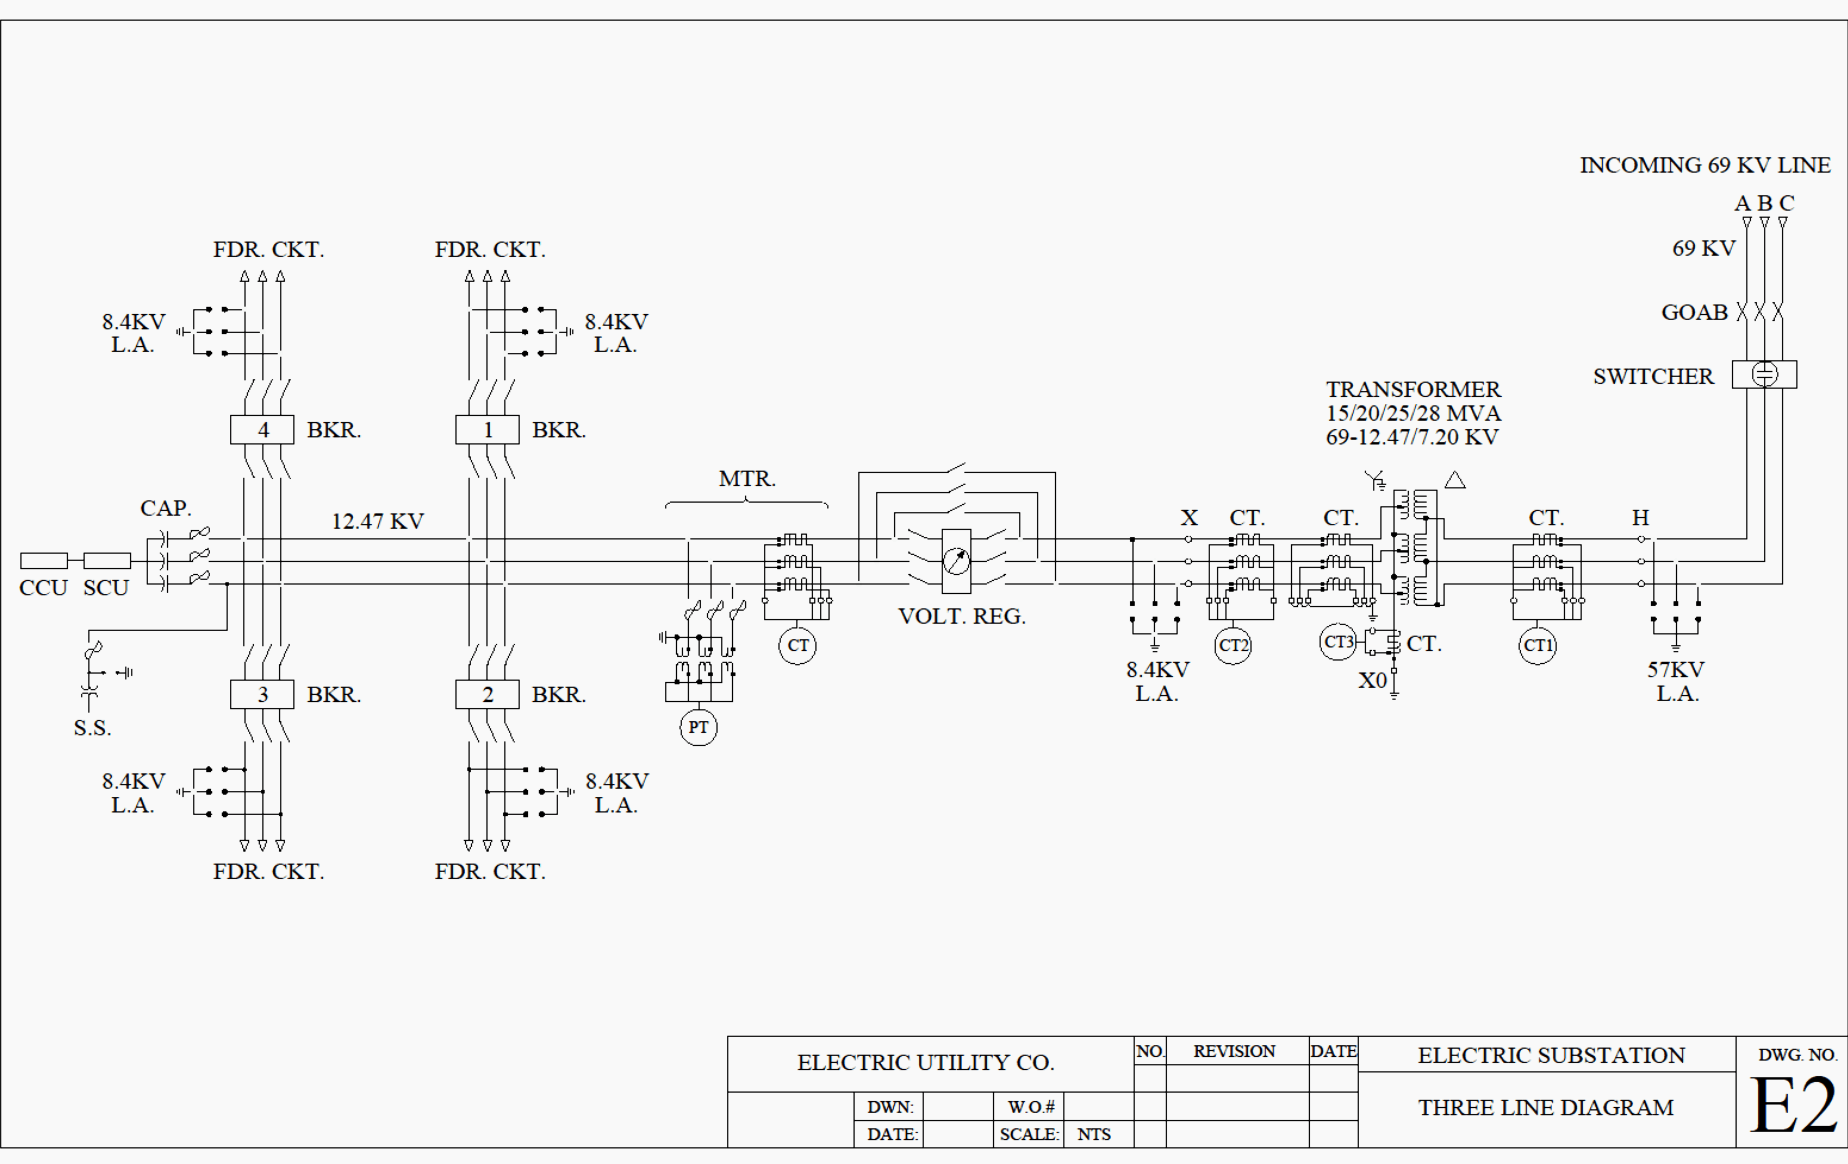
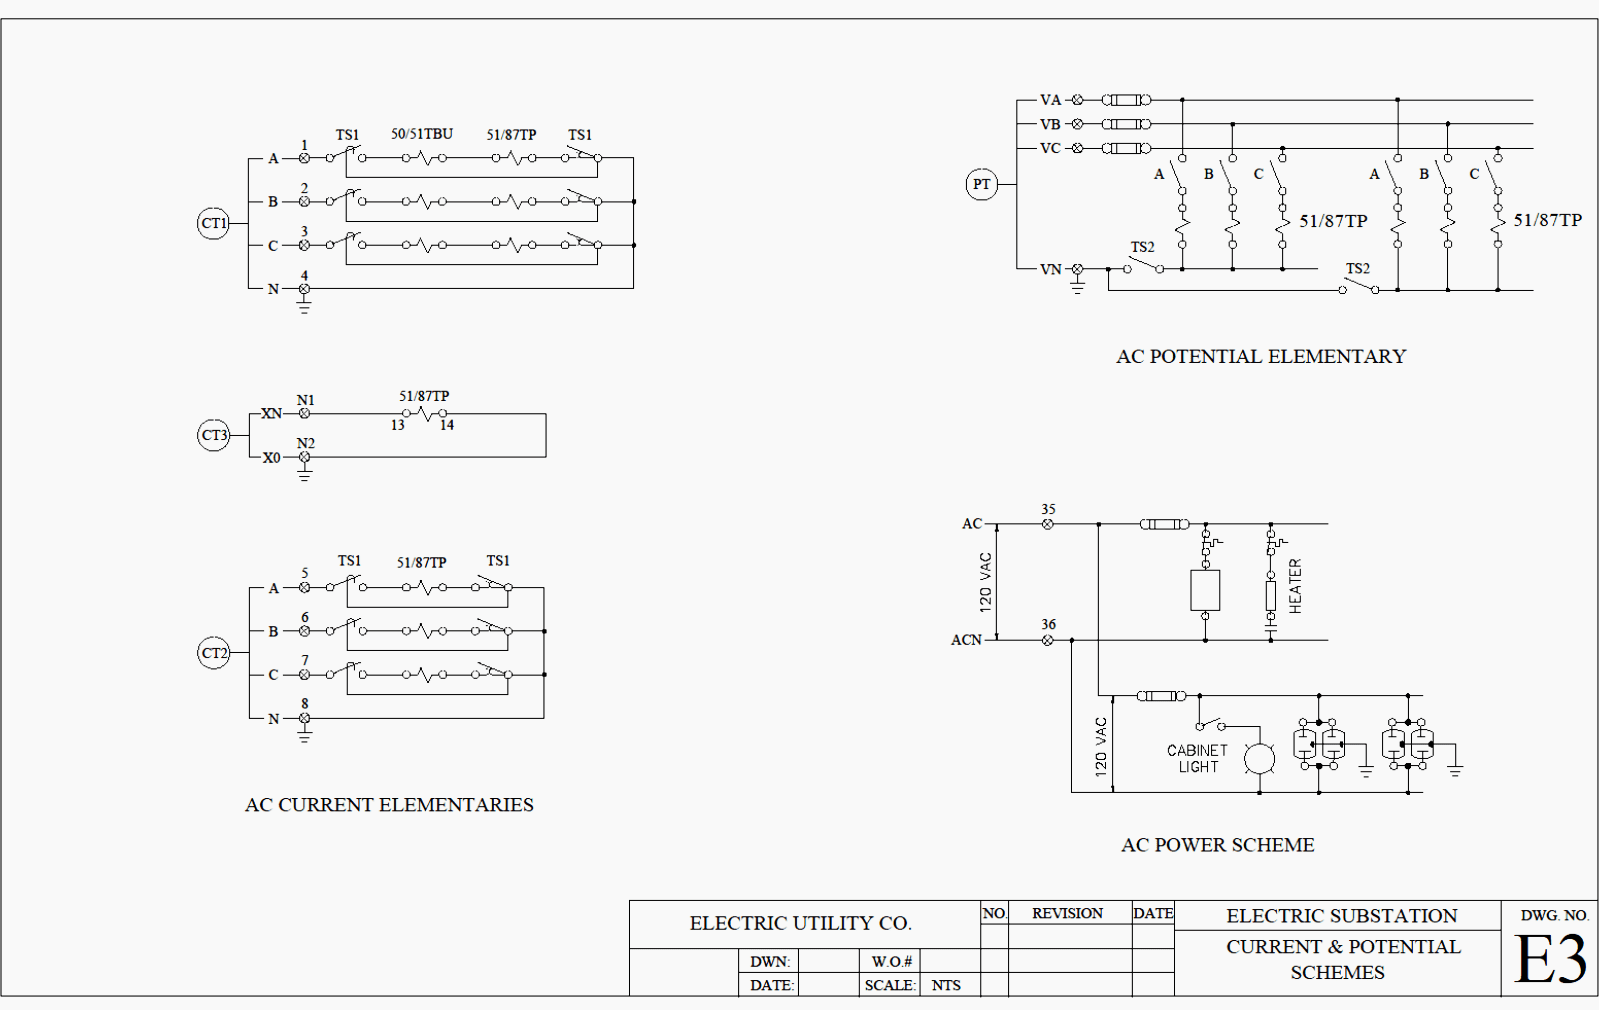
AC Schematics, which are also called AC Elementary Diagrams or Three Line Diagrams, will show all three phases of the primary system individually.
Examples of this can be seen in Figures 1, 2 and 3. Similar to the one-line, the location of all significant equipment will be shown. Bushings are identified on circuit breakers and power transformers.
Detailed connections to all equipment utilizing AC inputs will be shown as well. These detailed connections often include terminal numbers. The example figures do not include all terminal numbers for the sake of readability.
Example A – AC Schematic

Example B – AC Schematic

Example B – AC Schematic Continuation

1. Instrument Transformers
Voltage Transformers (VT) or Potential Transformers (PT)
The AC schematic will show the point on the high voltage system where each VT is attached and provide both primary and secondary connection details for each of the phases.
Details will typically include winding ratios, number of primary and secondary taps, polarity marks, nominal voltage ratings, and winding configuration (e.g. delta, grounded wye). If secondary fuses are used, their location and size would also be shown.
Current Transformers (CT)
Multi-ratio current transformers are commonly used for protective relay applications. CT location, full and connected ratios, polarity, and winding configuration (e.g. delta or wye) will be indicated on the drawing.
Nominal secondary current rating (commonly either 1A or 5A) will also be shown along with secondary wire names, for example C1, C2, C3, and C0 for the set of CTs connected in a wye configuration on Figure 1.
2. Protective Relays
Protective relays that are applied to monitor changes in the AC system will be shown on the AC schematic connected to current and voltage transformer secondary outputs. Diagrams must show detailed connection information that follows manufacturer recommendations to insure correct operation.
If a circuit is protected with a number of single function devices (these would typically be electromechanical relays) it is important to show current and voltage connections to each of the elements that make up these relays.
When microprocessor relays are used, internal relay program parameters will determine how secondary input quantities will be measured as well as the directional sensitivity of specific elements. Additional information will be required on this drawing if it is needed to detail exact functions that are in use.
Another vital function of the AC schematic is to show how the AC current and voltage circuits can be isolated for testing. Detailed information regarding the wiring and operation of these test switches are included in these schematics and an example can be seen in the lower left corner of Figure 1.
Here current test switch 6 TC clearly shows the terminal point number and what each test switch does on operation. For example, test switch 1-2, when opened, will short the circuit from point 2 to point 4.
This level of detail is needed to insure that testing can be done easily and avoids errors while testing.
3. Metering Functions
Metering information generally required for utility operations may include voltage, current, power (both Watts, and Vars) as well as other values. Present microprocessor relays are often capable of providing this information with acceptable accuracy.
Discreet metering devices including panel meters and transducers are often no longer required.
With the use of these relays to perform metering functions, it is no longer necessary to carefully detail all the transducers needed to perform the same functions.
2. DC Schematics
DC schematics, often referred to as elementary wiring diagrams, are the particular schematics that depict the DC system and usually show the protection and control functions of the equipment in the substation. It should be noted that sometimes the control functions are supplied by AC and are included in the elementary diagram (refer to Figures 6 and 8).
One example of a DC schematic is a circuit breaker control schematic that shows the tripping and closing of the circuit breaker whether from controls or protective devices as well as the alarms for the circuit breaker.
Examples of typical elementary diagrams are shown in Figures 4, 5, 6, 7, and 8.
Electric utilities have used elementary wiring diagrams to show their designs for many years. As the experience in using these drawings grew, practices common throughout the industry arose while at the same time utilities developed many standards regarding the details of the elementary wiring diagram that works best for them.


Since the details in these standards often differ slightly but significantly from utility to utility, it is important to understand the standards when reviewing these types of drawings.
As utilities have gone through some corporate changes through the years such as merging various companies, the selection of a common standard can often be a challenging process.
Common Practices
There are a number of common practices that are seen in DC schematics. If complexity of the system requires it, the devices controlling the equipment, like the two relays featured in Figure 4, may be shown on one drawing.
The equipment being controlled would show up in another drawing, such as the switcher in Figure 5 below.
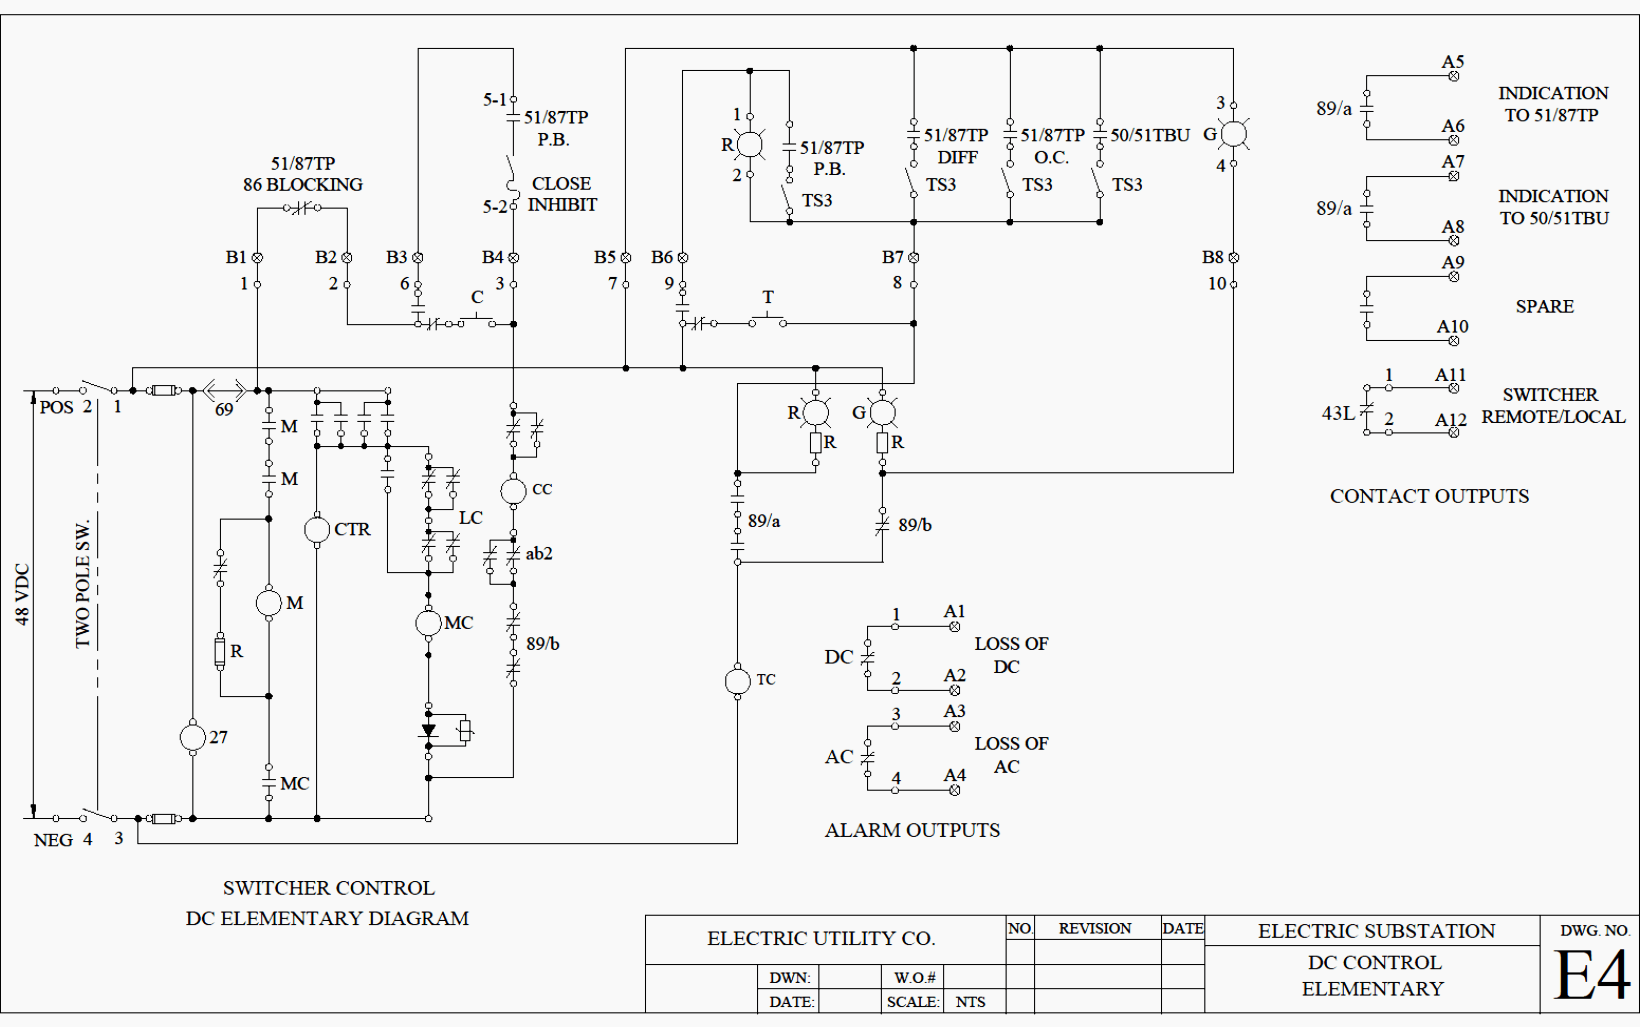

The DC circuit is usually shown with the positive bus closer to the top of the page and the negative bus closer to the bottom. The general layout of these drawings is that the DC source is usually shown at the left end of the drawing and the initiating contacts are shown above the operating elements.
There are also functional similarities with the AC schematics. Similar to AC schematics, the DC schematics will include the rating for circuit elements such as fuses, heaters and resisitors.
For example, in Figure 6 we see that FU-1 is rated at 20A, that HTR2 is rated for 300W at 240V and that a 7500Ω resistor is needed when connected to 250VDC.
And just like the AC schematic, the location of test switches are shown in detail so outputs and inputs can be isolated for testing.
Refer to Figure 5 and the test switches for the outputs of relays 87TP and 50/51TBU.
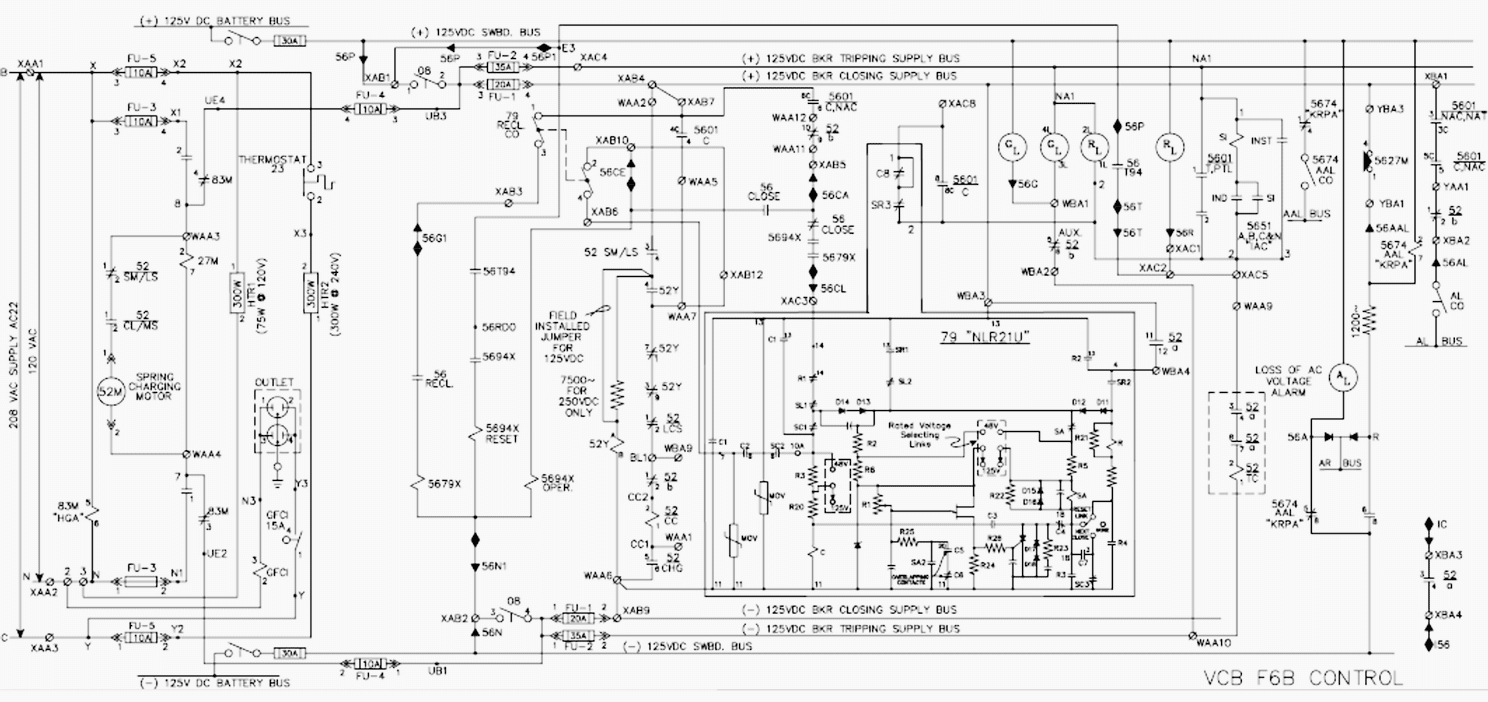

Figure 6 provides examples of the transition that schematics make between the functional design and the physical design. Near the center of the figure is the number 13 just above the text “79 “NLR21U”.
Note that 13 is repeated to the right next to the contact labeled R2 and to the left next to the contact labeled C1. The repetition of 13 is not needed on this schematic to communicate that all these points are electrically the same, this fact can be easily seen in the drawing.
However, 13 is also used in the physical design shown in the wiring diagrams.
Terminal blocks will be marked with this number and in this application, it is an indication that all the points are electrically the same and can be identified by the same 13 on this schematic.
Unique Standards
Figure 6 provides examples of standards that have been developed regarding the details of the design. For instance, the black triangles and diamonds throughout the drawing have specific meanings regarding the disposition of the wires.
They symbolize transitions from one location to the next. Care must be taken to appreciate the difference between the black triangle symbol used to indicate transitions and the black triangle symbol used in the lower right to indicate a diode.
DC Schematics and the Microprocessor Relay
Today a new challenge is occurring as utilities have moved from their traditional designs using electro-mechanical relays to designs using microprocessor relays and advanced communications systems.
The basis of the problem is the design of the protection system has moved from a hardware based system to a software based system with little experience in the best methods to document these designs.
Documentation of the logic in microprocessor relays adds one level of challenges and the advent of schemes that use relay to relay communication connections and protocols, such as IEC 61850, add another level of challenges.
As with traditional designs, utilities will continue to document the hardware connection on the elementary wiring diagram. Since microprocessor relays are so powerful and flexible a new emphasis rises to show not only what the protection design is but also what it is not.
In other words, the documentation needs to capture the IED resources available if the design ever changes and new resources (IED inputs and outputs) are required.
Relay I/O
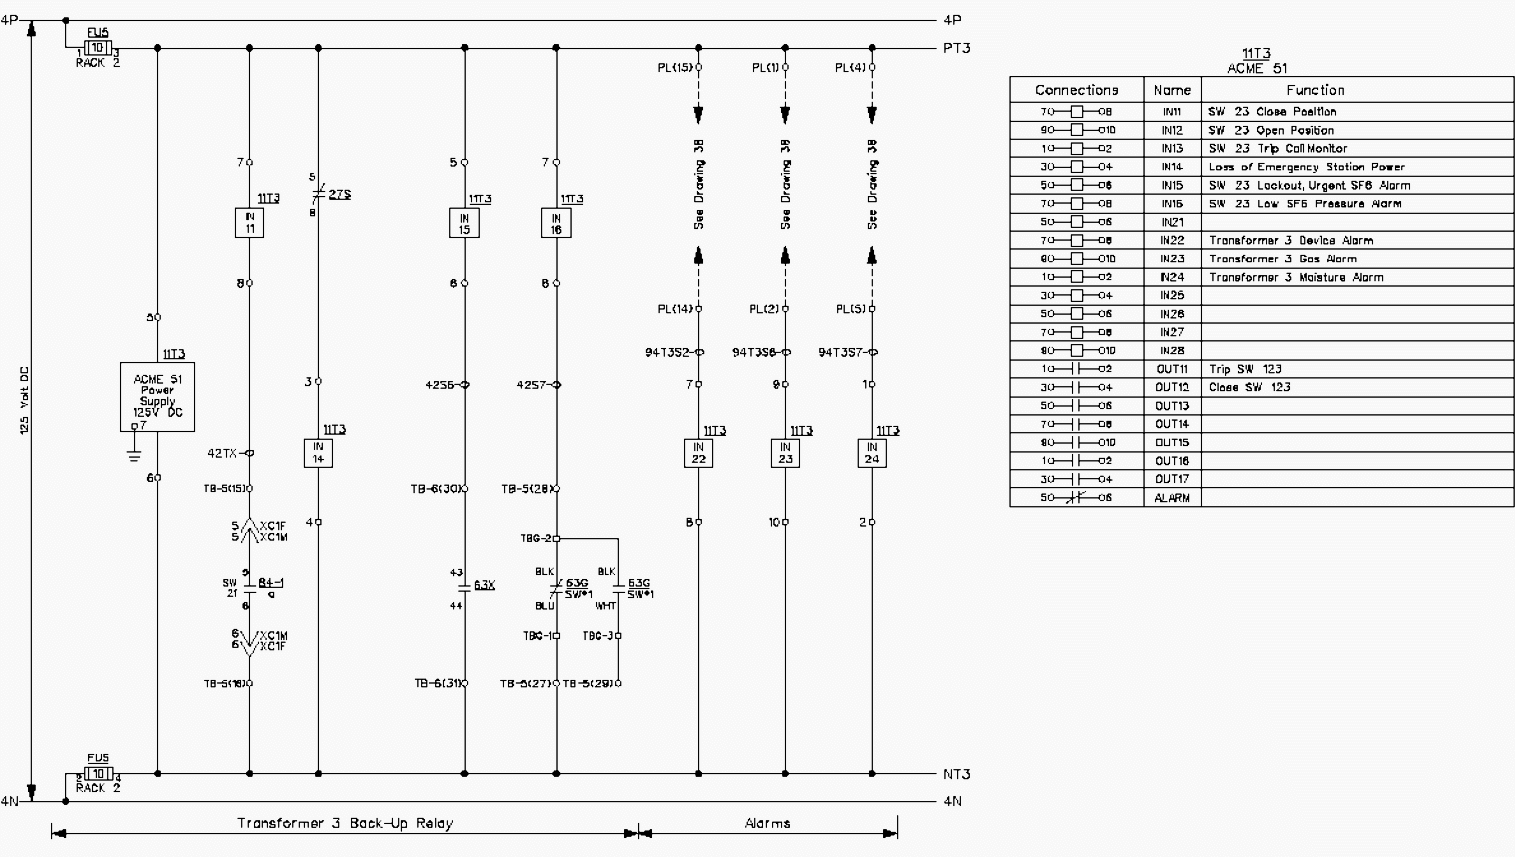
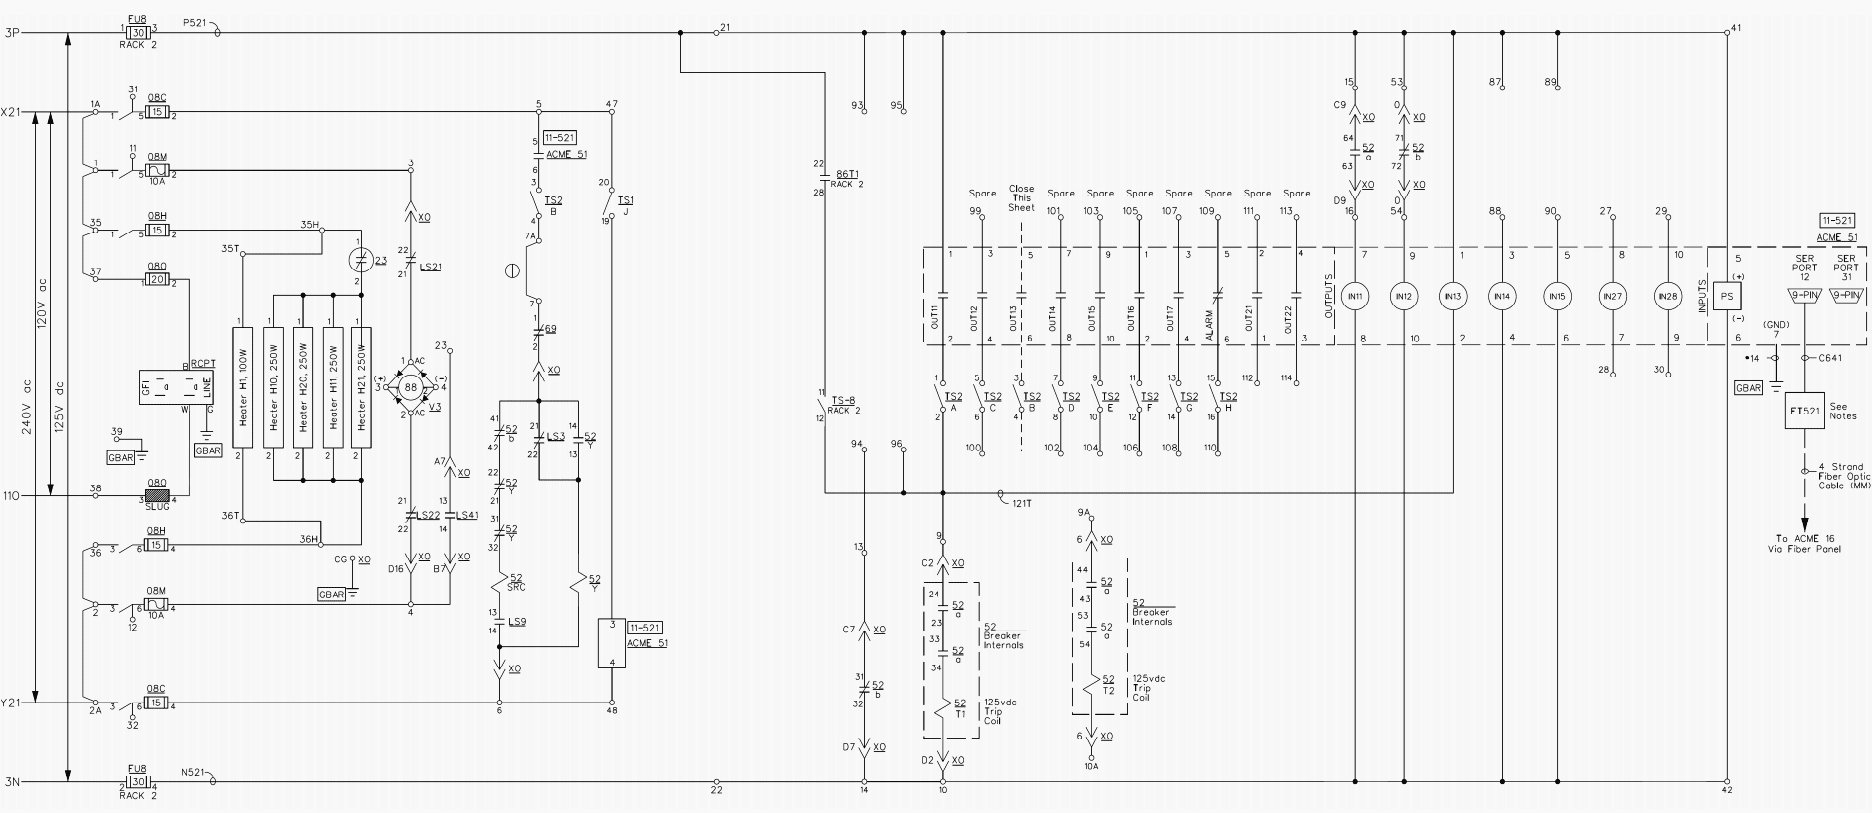
One useful table generally included on a DC schematic or one-line would be a table of the inputs and outputs on a microprocessor relay, indicating which were being used (labeled with associated function) and which were available. This table is handy in tying the required functionality of the settings and logic to the physical wiring and the settings of the relay.
This table is shown in the right of Figure 7. Another approach, shown in Figure 8, is to show all the available relay inputs and outputs in a graphical form on one drawing.

The connections showing the output and input contacts will be shown on the schematic diagrams but the issue remains how one documents what is happening within the programming. Several alternatives will be presented that have worked for other utilities.
One of these alternatives may appear to be the best choice or a combination of approaches may work. It is also noted that these alternatives are not all-inclusive and a better idea may be developed. The alternatives that will be briefly discussed include hardware only documentation, software shown as part of the traditional elementary diagram, and showing a logic diagram on the elementary.
The first approach is to document only the hardware that is connected on the relay. In addition to showing the specific contacts that are used in the design, labels could be used that may show small details regarding the contact such as ‘51’ for overcurrent relay contact.
One option would be to include more information on the relay setting sheet or some other type of documentation that goes with the relay.

The additional document could include a verbal description of the relay logic that allows one to understand when the contact will operate. Logic diagrams could also be used as the additional documentation to show how the design is developed.
One advantage to this approach is it keeps the elementary wiring diagram simple for those who do not require the details. For those that need the details, they can obtain it from the additional documentation.
Another advantage to this approach is the flexibility improvement for most organizations. The changes of elementary wiring diagrams often require a process of obtaining approvals that hinders making changes often.
The second alternative is to show the details of the logic in the form of the elementary wiring diagram. So, similar to the wiring diagram, if logic is using an “OR” function then the variables are shown in parallel. If an “AND” function is used then the variables are shown in series.
The difficulty in this alternative is distinguishing between hardware connections, which feature physical contacts, and the logic, which depicts logical outputs as contacts. Therefore it may be beneficial to use different colors or line types for software logic.
One other alternative is to use logic diagrams on the elementary wiring diagram. Logic diagrams are a graphical display that shows what is happening in the logic of the relay or communications system.
DC Schematics and IEC 61850 Station Bus
Early applications of relay protocols provided engineers with basic tools for substation automation, but they were often limited in functionality. Several are proprietary and for that reason, one must reference the vendor manufacturer’s relay manuals for schematic representation methods.
IEC 61850 differs from other standards/protocols because it comprises several standards describing client/server and peer-to-peer communications, substation design and configuration, and testing.
IEC 61850 provides a method for relay-to-relay interoperability between IEDs from different manufacturers. With the open architecture, it freely supports allocation of C37.2 device functions.
Because of this feature, it eliminates most dedicated control wiring that would normally be wired from relay-to-relay (i.e. a trip output contact from one relay to the input coil of another relay).
Due to this digital communication between relays, a typical DC schematic diagram alone is not an adequate method for describing the system.
Therefore IEC 61850 GOOSE messages (signals) are best represented in a point-to-point list or spreadsheet format (e.g. a bus differential relay would subscribe to all associated feeder protection relays on that bus, or a main-tie-main relay group would subscribe to each other to perform breaker interlocking).
This point-to-point (publisher/subscriber) list is not maintained by a computer on the Ethernet network, but instead a protective relay engineer uses a System Configurator software tool to program each IED to subscribe to each other depending on the protection scheme.
It is possible for one IED to communicate the same protective message to several other IEDs at the same time. The IEDs, once programmed to communicate with each other, will manage the messages they have been programmed to receive and transmit.
Reference // Schematic Representation of Power System Relaying by Power System Relaying Committee IEEE Power Engineering Society


Good overview. Thank you!
Very informative and intersting I am technical person my experience 38 years in Generation and transmittion would you like send the Sea side HV transmission lines failure
I am a tacnical person and i like this tacnical work.
Felicitaciones y gracias por compartir este valioso material técnico 👏👏👏
I am student
Thanks a lot
Very useful information.
It has given me a remarkable points to more when analysing the schematics. Keep the spirit of sharing alive.
Good material and explanations, Thanks for propagating technical ,very useful information
Thanks for all very educative materials, it help to build up my technical skills on the electrical/electronic fields
I’m already a regular follower of EEP. I hope I can automatically download your documents. Thank you and God bless.