Why does insulation go bad?
Due to mechanical damage, vibrations, (excessive) heat/cold, moisture/humidity, chemical influences and interactions and aging pinholes, cracks causes moisture and foreign matter to penetrate the surface of the insulation. They create a low resistance path which allows leakage current to flow through or over the insulation, causing flash-overs and overloads.
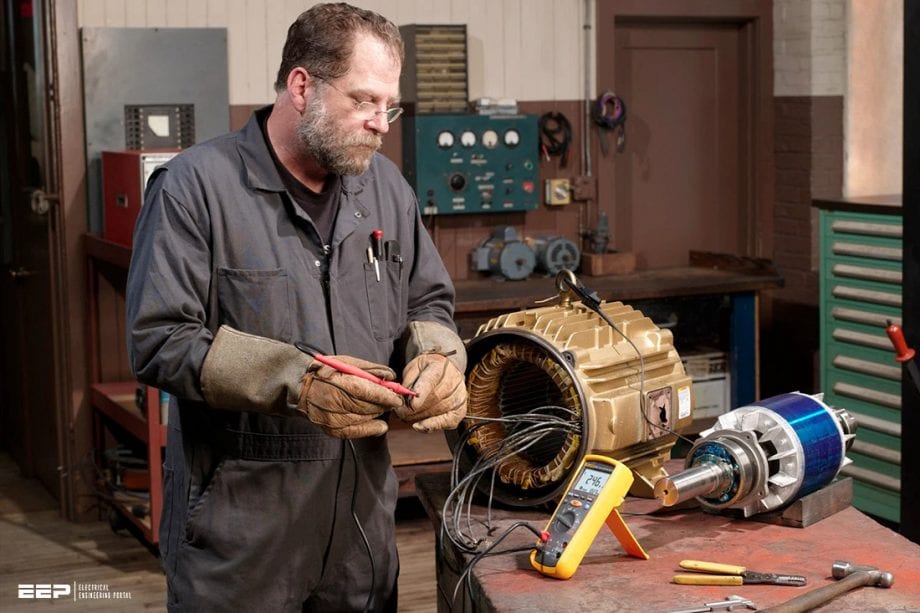
There are two ways the resistance drops. A sudden decrease in resistance is caused by a breach or damage to the insulation. On the other hand, a gradual decline in resistance is often the result of moisture, dirt or aging (cracks) of the insulation.
- The value of the resistance (One-mega-ohm rule)
- Behavior of insulation resistance
- How to interpret readings
- Measuring
- Types of insulation tests:
- Test voltage vs. equipment rating
- Tests during drying out of equipment
- Effect of temperature on insulation resistance
- Preparing to test
- Safety precautions
1. The value of the resistance
A well-known way to determine the minimal allowed insulation resistance, which is used by many professional engineers and electricians, is the “one-mega-ohm rule”. This states that the minimal insulation resistance has to be higher than 1 mega-ohm for each 1000 volts of operating voltage.
Although is commonly used, the best way to determine the correct value is to consult the classification rules applying for your installation.
2. Behavior of insulation resistance
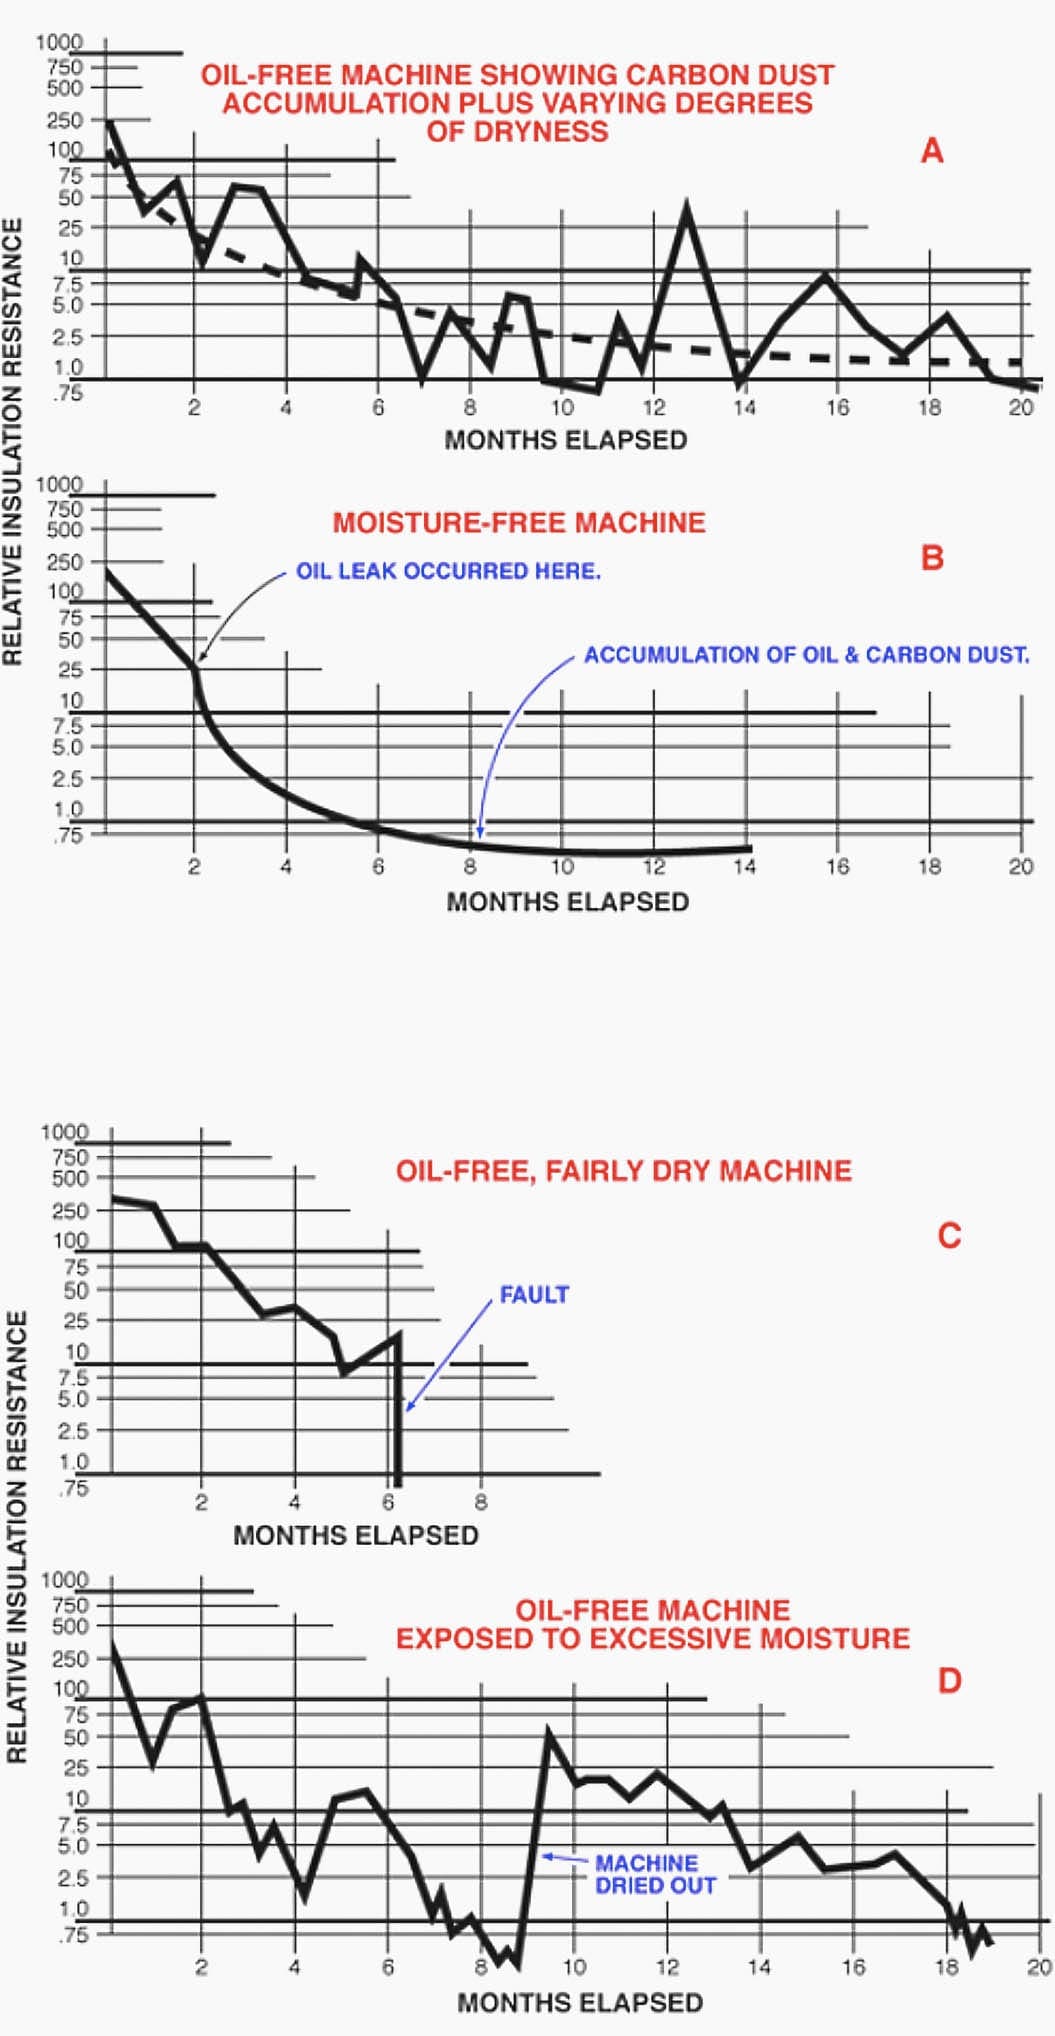
As earlier stated, the insulation resistance varies over time. By keeping records the trend of this value is easily monitored. In the following examples this behavior of insulation is shown under varying plant conditions.
They show the evolution of the insulation resistance over several months.

3. How to interpret readings
These readings are relative. More important is the trend. A value of 12 MΩ can be good, if it is stable. If the previous reading was 30 MΩ, it’s worrying. A continuous decrease in resistance will sooner or later give you problems.
A downward trend is a fair warning of trouble ahead, even though the values may still be higher than the minimum. When the measured values are low but consistent, the installation can be fine. When to take witch action depends on the situation.
The following guide helps you determine your actions.
| Condition | What to do? |
| Fair to high values / well maintained. | No cause for concern. |
| Fair to high values, but showing a constant tendency towards lower values. | Locate and remedy the cause and check the downward trend. |
| Low but well maintained. | Condition is probably all right, but cause of low values should be checked. |
| So low as to be unsafe. | Clean, dry out, or otherwise raise the values before placing equipment in service. (Test wet equipment while drying out. |
| Fair or high values, previously well maintained but showing sudden lowering. | Make tests at frequent intervals until the cause of low values is located and remedied; or until the values have become steady at a lower level but safe for operation; or until values become so low that it is unsafe to keep the equipment in operation. |
4. Measuring
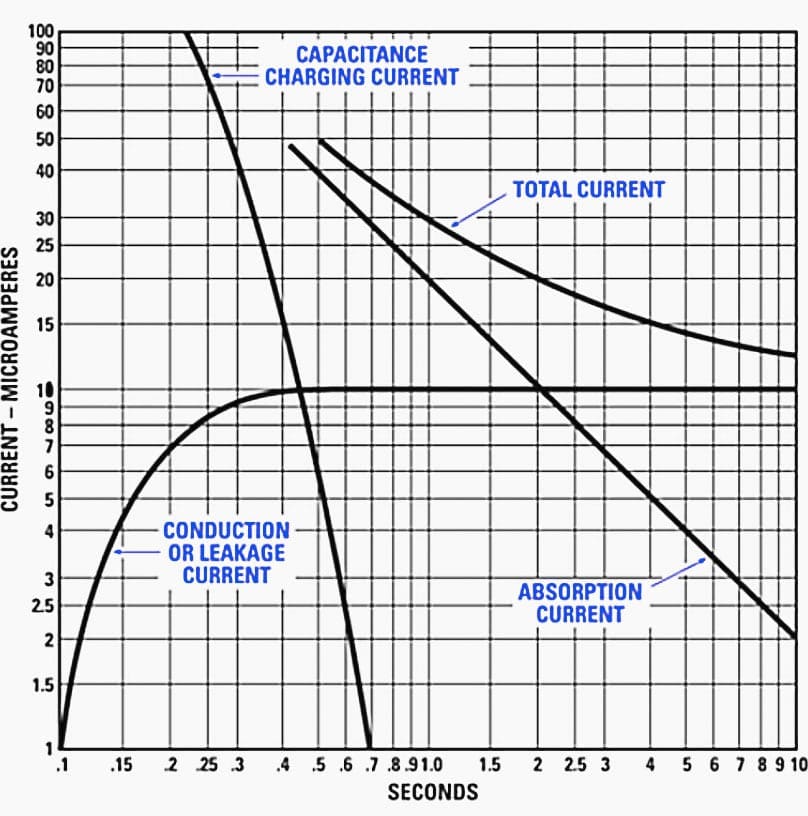
The insulation tester connects a DC source to its terminals and measures the current, passing through the connected component. This current consists of multiples currents, flowing between the terminals.
- Total current: Indicated by instrument
- Capacitance Charging current: Drawn into the insulation by the polarization of the electrons. Starts high and drops after insulation has been charged to full voltage. Time depends on capacitive properties of the apparatus.
- Absorption current: Initially high and drops due to absorption capacity of the insulation.
- Conduction/leakage current: Steady current through & over-insulation. This is what’s important!

5. Types of insulation tests:
There are three main tests we can perform, testing insulation. Each has their purpose and application. To get a proper, total image of the condition of the insulation, it is recommended to execute multiple tests.
5.1 Short-time/Spot-reading tests
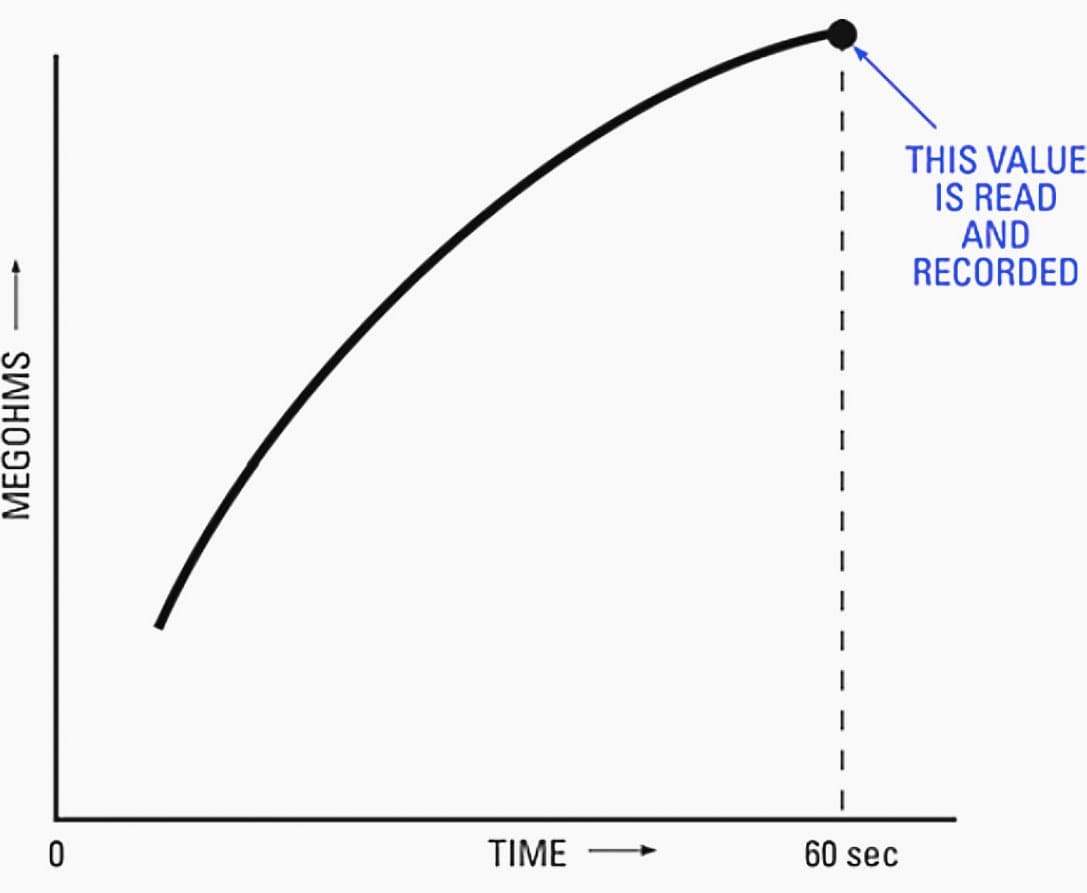
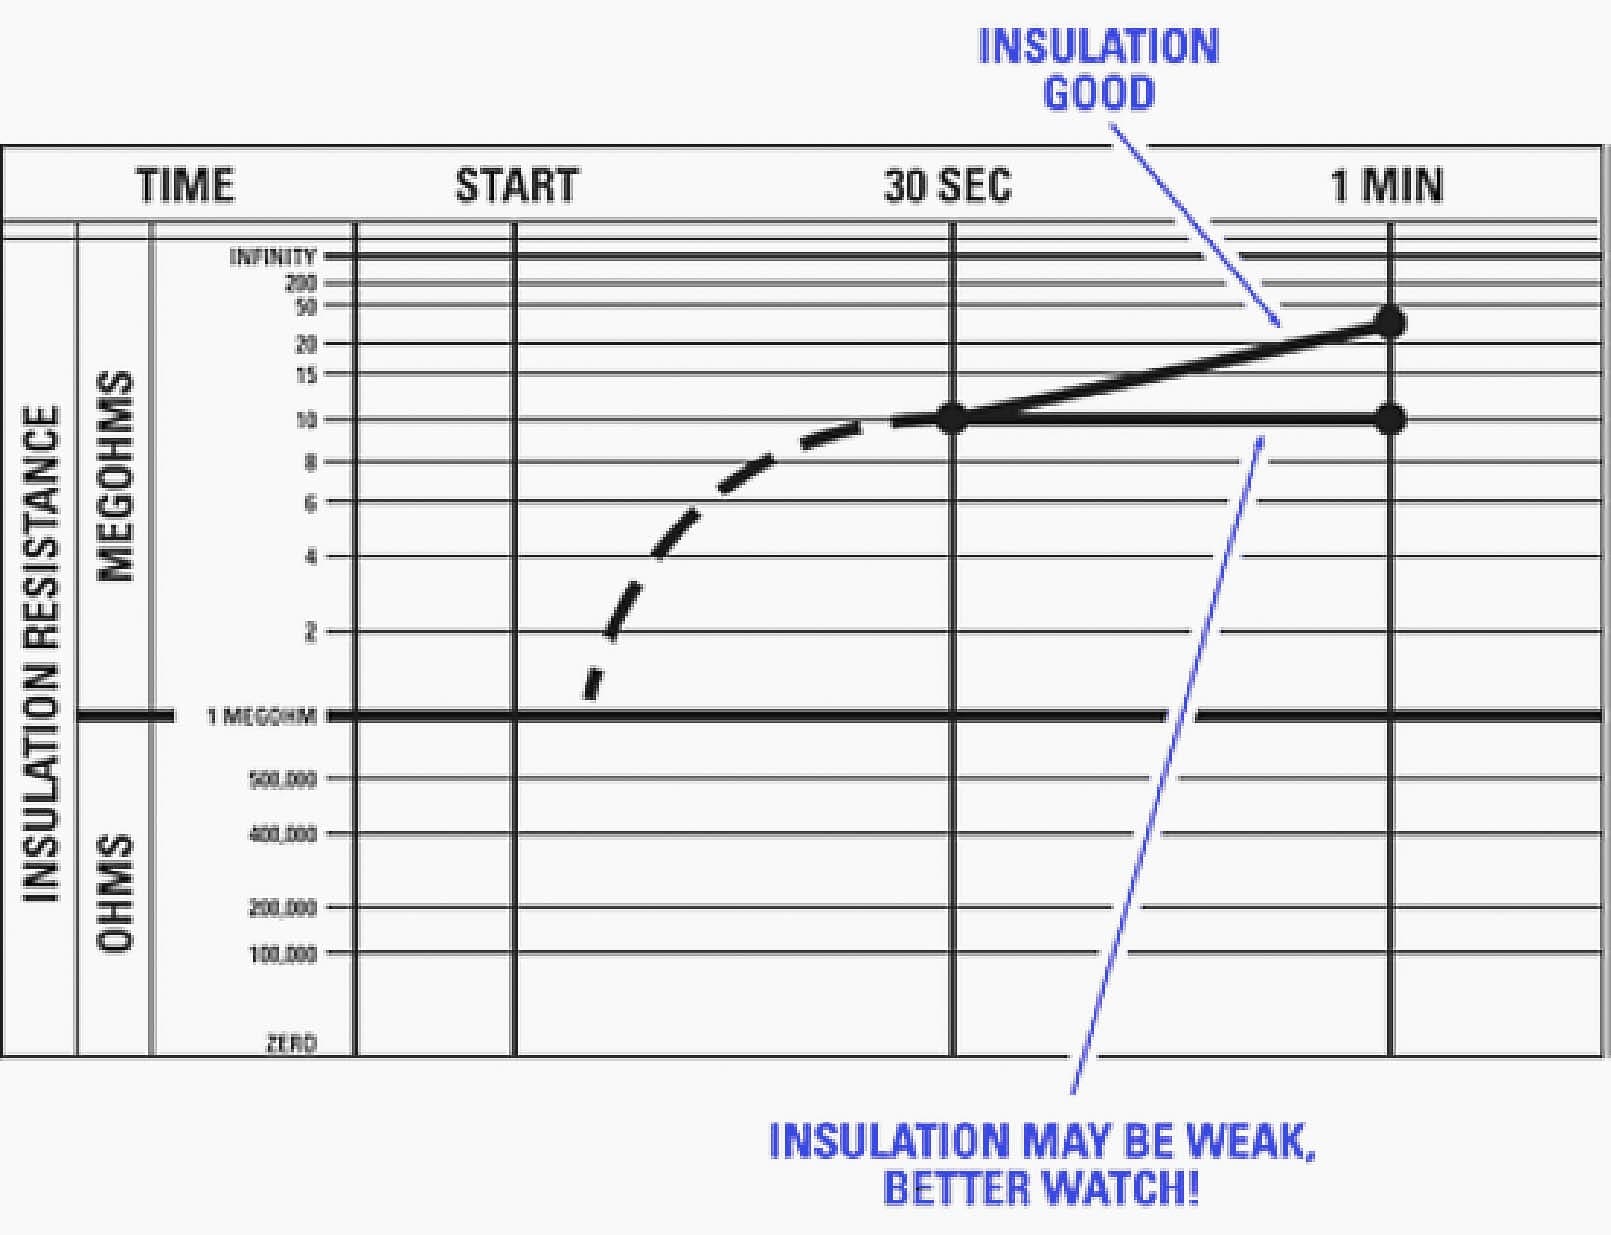
Short-time Measurement (approx. 60 sec)
Here we connect our tester across the insulation and operate it for a short, specific time period. Note that the measurement varies with the time. This means that after 30 seconds you will read a different value. Temperature, humidity and insulation condition will affect the reading. This testing method is fine if you test apparatus that have a no or small capacitance.
However, high voltage equipment nearly always has considerably large capacitive properties so this short test only gives us a rough idea of the quality of insulation and isn’t failsafe.
For accurate determination it is recommended to use one of the following methods.

5.2 Time-Resistance Method
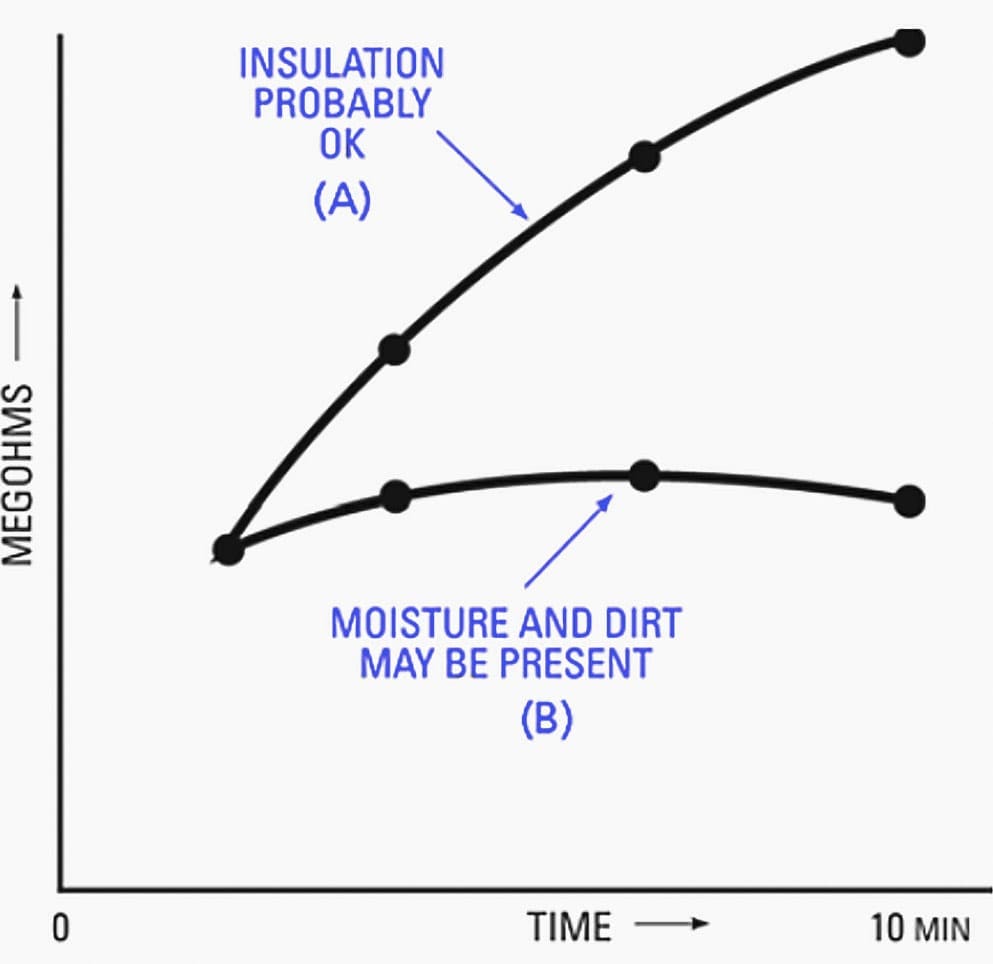
This method is fairly independent of temperature and gives you conclusive information without previous records. It is based on the absorption effect of good insulation compared to that of moist or contaminated insulation.
You simply take successive reading over specific time intervals and note the differences.
This test is independent to the equipment size. The increase in resistance for a clean and dry insulation occurs in the same manner than whether the component is large or small.
Good insulation shows a higher value after a longer period of time. Suspicious insulation will show a leveling in resistance.


5.3 Dielectric Absorption Ratio and Polarization Index
The ratio of two time-resistance reading is called a Dielectric Absorption Ratio. It is useful in recording information about insulation. If the ratio is a 10-minute reading divided in 1-minute readings the value is called the Polarization Index.
These results give you an easy view on the quality of the insulation.
| Insulation Condition | 60/30-Second Ratio | 10/1 Minute Ratio (Polarization Index) |
| Dangerous | – | Less than 1 |
| Questionable | 1.0 – 1.25 | 1.0 – 2.0 |
| Good | 1.4 – 1.6 | 2.0 – 4.0 |
| Excellent | Above 1.6 | Above 4 |
5.4 Step Voltage Method
Here, we use a multi-voltage instrument to apply 2 or more voltages in steps. We look for any reduction of insulating resistance at the higher voltage. If the resistance drops, it’s a sign of insulation weakness that shows up at higher voltage.
Effects of aging or mechanical damage in fairly clean and dry insulation may not be revealed at such low stress. At higher voltages, the resistance of such local faults generally decreases rapidly when electrical stress increases over a certain limit.
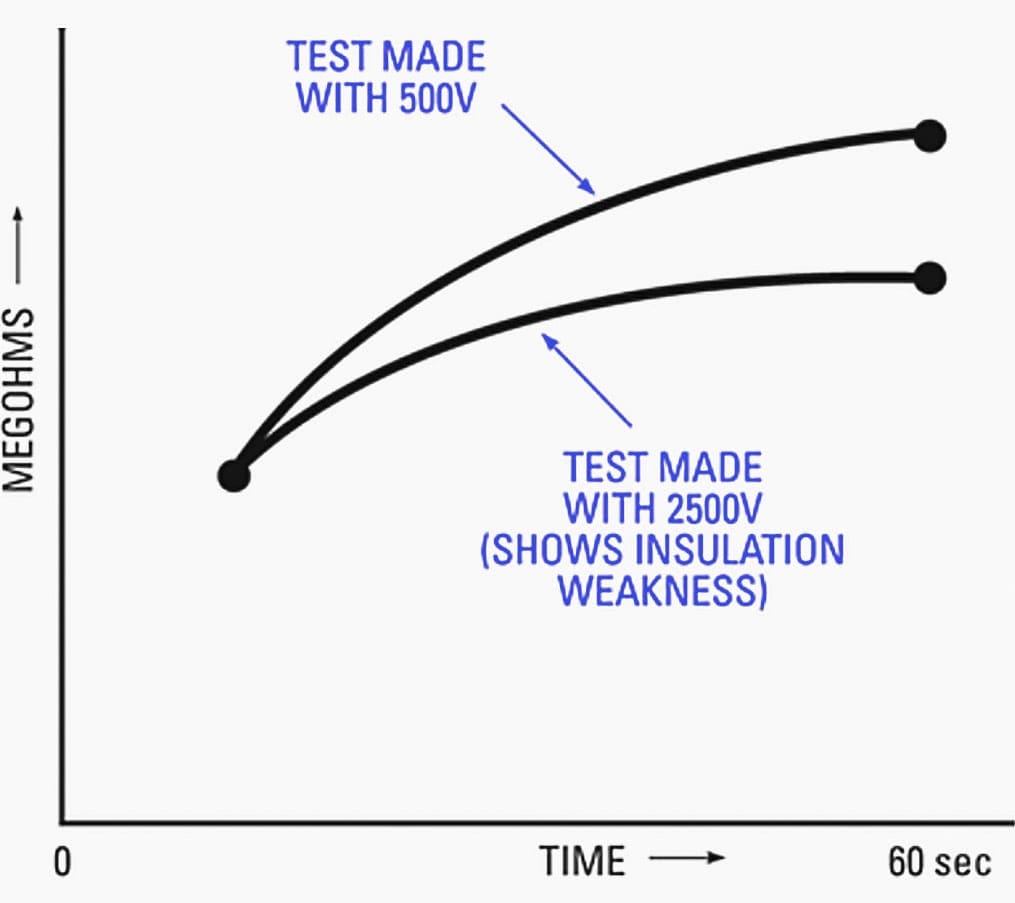

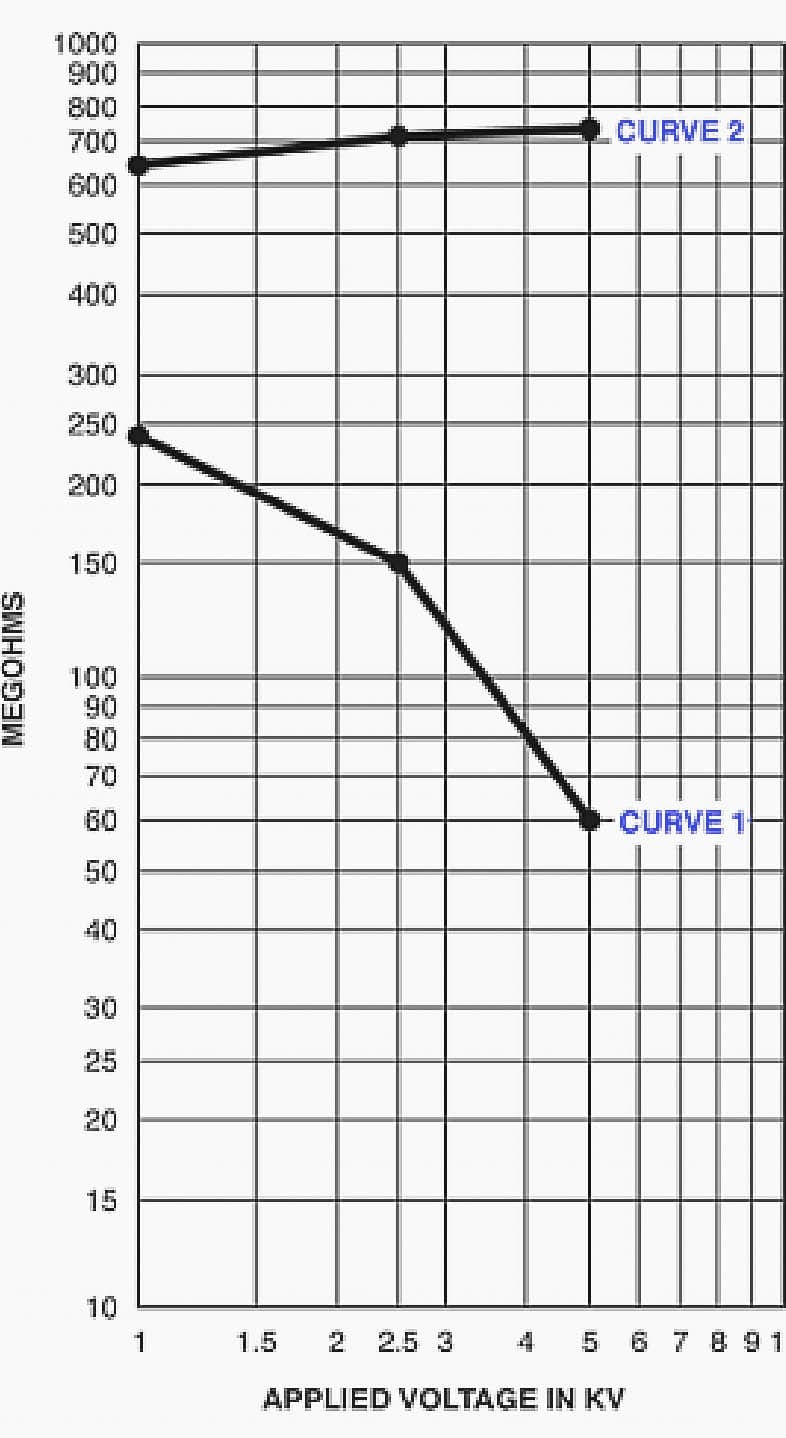

Curve 1 (lower plot) shows definite drop in resistance with increasing voltage, indicating a problem. Curve 2 (upper plot) shows conditions found in the same motor winding after cleaning, baking and impregnating operation.
Curve 1 shows the drop in resistance, indicating a problem. Curve 2 shows the same apparatus after cleaning, baking and impregnating operation. This method is useful in determining the presence of excessive moisture or other contaminants in the insulation of equipment.
6. Test Voltage vs. Equipment Rating
Commonly used DC tests Voltage for routine maintenance are as follows:
| Equipment AC Rating | DC Test Voltage |
| < 100 V | 100 – 250 V |
| 440 – 550 V | 500 – 1000 V |
| 2400 V | 1000 – 2500 V |
| 4160 V and above | 1000 – 5000 V or higher |
Test Voltages for proof testing of equipment are considerably higher than those for routine maintenance. For specific recommendations you must consult the manufacturer.
Proof test Voltages for rotating equipment:
- Factory AC test: 2 × identification tag Rating + 1000 V
- DC Proof Test on installation: 0.8 × Factory AC Test × 1.6
- DC Proof Test After Service: 0.6 × factory AC Test × 1.6
7. Tests During Drying Out Of Equipment
Wet electrical equipment is a common hazard faced by all maintenance engineers. If the equipment is wet from fresh water, just dry it out. Salt water will leave corrosive deposits of salt on metal and insulating surfaces, as well as in cracks of the insulation.
Therefore, an excessive clean with fresh water is essential.
It is advised to limit the test voltage in the early stages of the drying-out process.
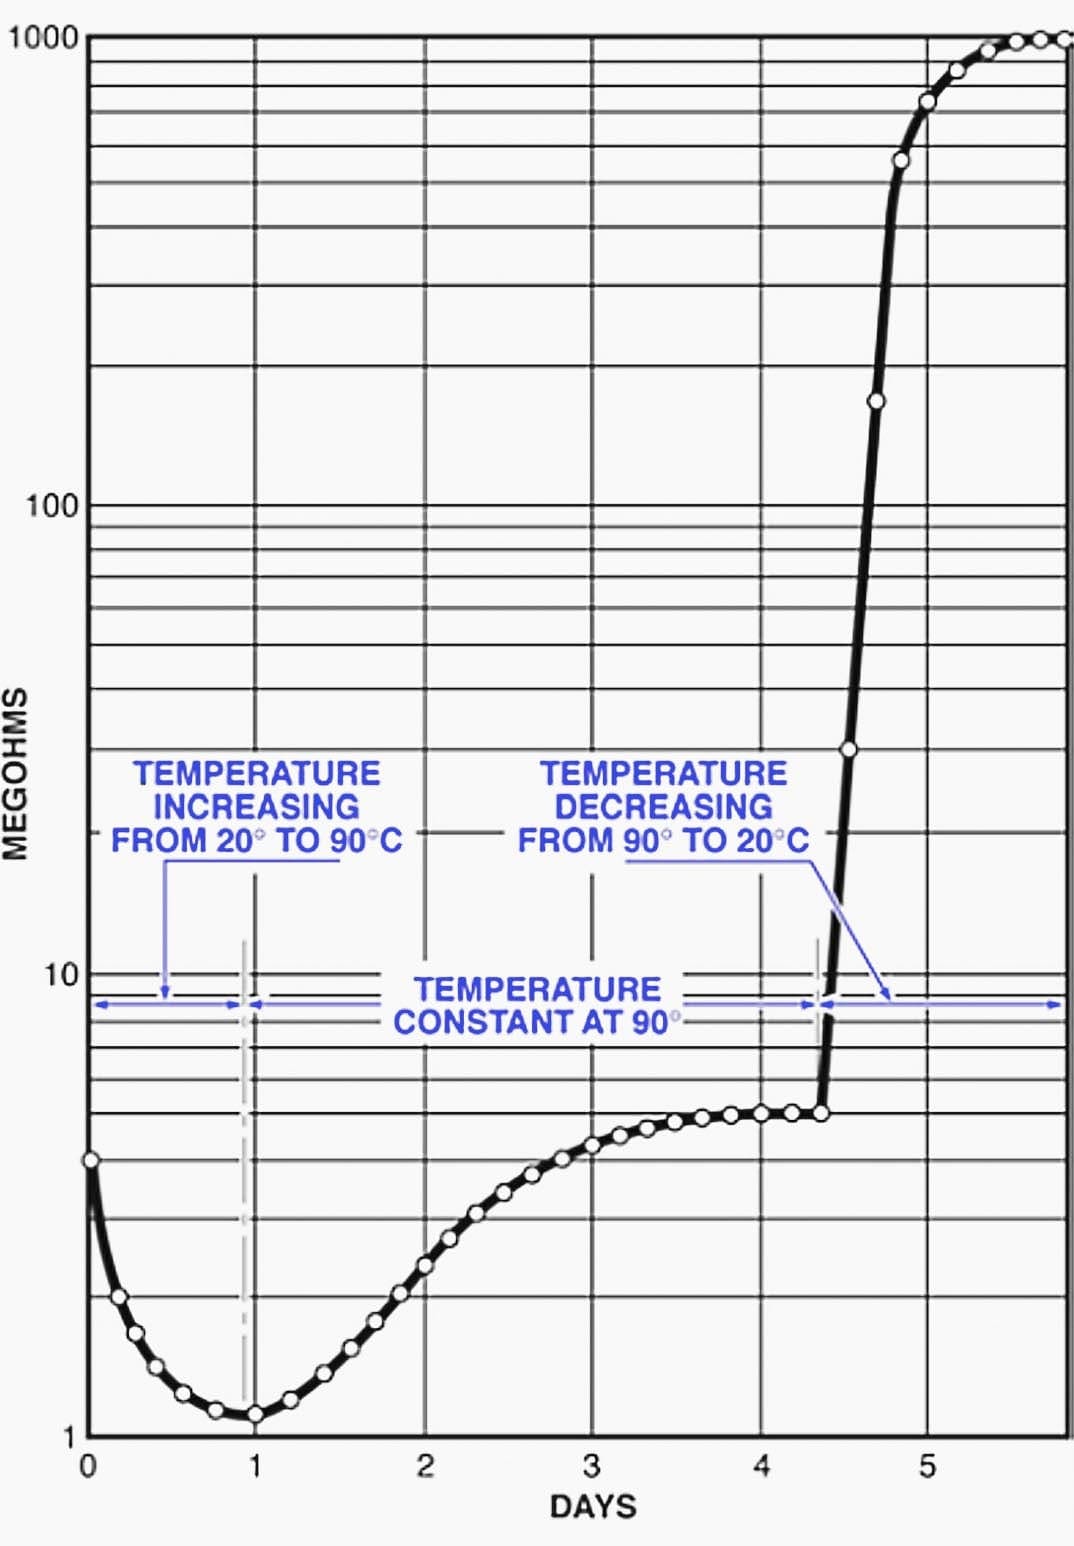
The drying-out curve above (armature of a DC motor) shows how insulation resistance changes after heating. The resistance drops (due to temperature) and then rises as the drying proceeds. Finally it rises to the required value as room temperature is reached. Using the previous tests, you will know when you have reached the safe value.
By testing periodically and using the DAR (Dielectric Absorption Ratio) or PI (Polarization Index), it is possible to follow the dry-out process (compensate temperature).
Interesting reading:
8. Effect of Temperature on Insulation Resistance
The resistance of insulating materials decreases considerably with the increase of temperature. To make reliable comparisons between readings, we must correct these reading to a base temperature (20 °C) or always take readings at the same temperature.
Main rule! For every 10◦c increase, halve the resistance. For every 10◦C decrease, double the resistance. Each insulation type will have a different degree of resistance change.

9. Preparing to Test
- Take Out of Service!
- Shut down
- Open switches
- De-energize (earthing)
- Disconnect
- Disconnect lines
- Disconnect neutral and protective earthing (SANCTION TO TEST!)
- Make Sure Just What in Included in the Test!
- Inspect the installation
- What’s connected/included in test?
- Pay attention to conductors that lead away from installation (Check an additional equipment that will decrease resistance)
- It may be necessary to isolate component parts and test each one separately
- Discharge of Capacitance
- It is very important that capacitance is discharged, both before and after the insulation test.
- Discharge for a period of 4 times as long as the test voltage was applied.
- Current Leakage at Switches
- Beware that readings will not be affected by leakage over or trough switches or fuse blocks.
- Current of an energized line may leak into the apparatus and cause inconsistent readings (live line)
- Inspect the installation
Lock-out tag-out practice and seven other steps that save lives
10. Safety Precautions
- Observe all safety rules when taking equipment out of service.
- Block out disconnected switches.
- Test for foreign or induced voltages.
- Apply workmen’s grounds.
- When working around high voltage equipment there is always a possibility of voltages being induced in apparatus under test or lines to which it is connected.
- Therefore it is advisable to disconnect from the bus or line.
- Use rubber gloves when connecting the test leads.
- Never test live apparatus!
- If ground connections have to be removed, make sure that they don’t carry current and that when disconnected, no other lose necessary protection.
- Beware for conductors leading away from the circuit and make sure they are disconnected from any power source.
- Shock hazard from test voltage:
- Observe the voltage rating of the instrument and regard it with caution!
- Large equipment can store up a dangerous amount of energy
- Discharge the capacitance after test and before handling the test leads.
- Explosion and Fire Hazard:
- There is no fire hazard in the normal use of the tester, however, a hazard when testing equipment in inflammable or explosive atmosphere exists.
- Sparking may occur when:
- Connecting the test leads without discharging the capacitance.
- During a test, arcing through or over faulty insulation.
- Following a test when capacitance is discharged, do not disconnect the test leads for at least 60 seconds following a test, allowing time to discharge.
Source: HV Safety by MARITIME ACADEMY


Your article on insulation Resistance of induction motors is Very impactive.It has really further-shaped my knowledge and now I can perform excellently technically at work sites.Thank you for this great insights and we urge you to show case more of this valuable articles.
Very good article about insulation resistance in electrical machines
I teach Technology and testing of electrical materials at Universidad Tecnológica Nacional
Very informative article.
I really need to perfect my AutoCAD electrical but all the time i download and choose electrical but the one i get has no electrical properties.please advice me how to get it.
Hello sir, please tell me how can I learn Matlab through online to be a professional, while I do not know anything about Matlab.
Valuable Good Information.
A great and usefull info
Is there any Standard for recommended values of Insulation Resistance?
Upvote on that question. Although believing that the ideal value is the one indicated on the equipments datasheet, it is often missed, so I am also looking for a kind of general standard.
Hi Edvard,
I’d like to be a professional in AutoCAD programming. Can you advise in this regard ?
Thanks
Omar